Quantcast
Channel: Elfshot
Viewing all 437 articles
Browse latest View live

A busy week for the NLAS

$
0
0
Dorset Palaeoeskimo Endblades from
The Anstey Site, Twillingate
I've been home for a little over a week now and already the summer feels like a lifetime ago.  I'm taking babysteps back towards getting back into the workshop and the production side of Elfshot up and running again, but last week was all about the Newfoundland and Labrador Archaeological Society (I'm the current NLAS President).  Last week we had a Board meeting, an Executive meeting, a Planning Committee meeting, and a meet-and-greet at the MUNArch mixer.  Already this week we've issued a Press Release and done one quick VOCM radio interview about our big summer Community Collections Archaeological Research Project.

Photo Credit:Robert Anstey, courtesy of the Newfoundland and Labrador Archaeological Society

Collecting Spruce Roots

$
0
0
A single long spruce root
Collecting spruce roots is one of those fun jobs that is over all too quickly.  Spruce trees have long networks of straight roots shooting out in all directions from their bases.  These roots are just below the surface and easy to access.  Some are quite large but the ones with diameters between a pencil and a sharpie make good, durable lashing materials.  I need a few feet of spruce root lashing to sew a reproduction Beothuk birch bark quiver together.

You can see the muddy path
where the root came out of
the ground and dozens of
smaller criss-crossing roots
The easiest place to collect spruce roots are in clearings in the woods where there aren't a lot of low lying shrubs or small trees between the spruce trees.  A bit of moss and forest litter is no problem.  Sometimes you can see places where the roots are peeking above the ground, but I usually just pick a soft looking piece of ground in the middle of the clearing and kick the dirt off until I start to see reddish-orange roots.  The roots are everywhere, so it doesn't take long to find one.  Pick one that is more-or-less the right diameter and start pulling it up.  You can tug fairly hard on them, but if you feel like you might break it, you can always do a little digging to loosen the ground above it.  While you are pulling up one root, you'll probably expose dozens of others and two or three of them will be about the size you are looking for.  It becomes a game of trying to find the longest, straightest root, with the least forks in it.

It only took 10 or 15 minutes to collect this bundle of roots.  Once the bark is stripped and split there should be 100 feet or so of good lashing material.


Strip off the outer layer
You can use them right out of the ground as lashing if you are building something outdoors, like a lean-to or emergency shelter, but for smaller projects, you'll probably want to clean and split them.  Cleaning the outer bark of the roots is a little tedious, but its not too difficult.  If you are very careful you can use a knife to scrape through the reddish-orange outer layer.  Once the light coloured inside is exposed, you can peel off the outer rind in strips.  A sharp edged stick is a smart alternative to using a knife.  It is just as easy, a little safer, and less likely to inadvertently damage the root.  After the outer bark is stripped, the root will be a pale blond colour.

Don't let the split run away from you,
keep pressure on both sides to keep
the split travelling down the middle
of the root.
Splitting the root down the middle will make it more flexible and less likely to kink as you use it.  To split the root, all you need to do is carefully cut a small slit in one end and start pulling the root apart into two equal halves.  Straighter roots without branches or forks are the easiest to split.  Once the split starts it is very quick and easy to make it grow the length of the root.  You want the split to run right down the middle of the root, so pull it apart slowly and if you see that it is starting to get a little thicker on one side, pull that side a little harder to coax the split back towards the middle.  Its hard to explain, but your fingers will know what to do.

Different diameter roots
give different sized
lashing
I don't want the roots to dry out too much before I use them over the next week or so, so I'm going to keep them in a cool dark place.  Which is easy to find in Newfoundland in September.

Photo Credits: Tim Rast

More than just a birch bark tube

$
0
0
The quiver should have a very slight taper from the opening
to the base.
The main project that I'm working on at the moment is a reproduction Beothuk birch bark quiver.  Conceptually, its a simple tube container, but it should also be tough and functional.  It's for a museum display so it needs to be made from the appropriate materials and match the few references that we have for Beothuk quivers.  I'll go into more detail in future posts, but here is a first look at the main body of the quiver.  I've cut it more-or-less to length, although there will be pieces added to each end, so I may need to trim it again to match the size that I'm going for.  I haven't sewn the main seem up the side yet, but I've cut the outside edge of the birch bark to a scalloped or "pinked" edge.  This is a design element common to Beothuk birch bark vessels that have survived in museum collections.  This edge may be purely ornamental, but I suspect it also helps in preventing tears in forming and spreading from the edge, the same as pinked edges work on fabric.

I used a plastic map tube as a form to wrap the birch bark around.  You can see it peeking out under the clothes pins.  You can also see the zig-zag edge running down the length of the tube.  These seem will be sewn together with spruce roots.
Photo Credits: Tim Rast

Pitcher Plants

$
0
0
When I was out looking for spruce roots last week, I was distracted by all the Pitcher Plants in their fall colours.


Photo Credits: Tim Rast

Beothuk Birch Bark Quiver Progress

$
0
0
The quiver... so far, so good.
My main goal in the workshop this week is to finish the reproduction Beothuk birch bark quiver.  Probably the biggest obstacles to overcome are that I don't have a lot of experience with working with birch bark like this or a pattern to work from.  As far as I know, there are no surviving Beothuk quivers and for a visual reference I only have one contemporary drawing to refer to.      

Detail from a 1773 map by John Cartwright.  I've used this reference before for bows and arrows and have found it to be accurate and plausible representations of the actual implements.  As I make the quiver, I'm finding the details of the quivers design and construction to be equally plausible and helpful.  There are details in the spruce stitching that make a lot of sense. 


The first step in assembling the brich tube was to sew the long seam running the length of the quiver.  I marked out the holes and drilled them prior to lashing them together with spruce root.  The 5 Xs in the foreground of the photo are the spruce root stitches and the pegs running off into the distance are holding the unlashed portion of the tube together through the drilled holes.

One of the big challenges was figuring out how to stitch the middle of the tube.  Working near the end wasn't so bad but as you get farther and farther into the cylinder it became impossible to thread the root through the holes just using my fingers.  I twisted and taped a long wire to the end of the root and used it as a kind of needle to thread the awkard stitches in the middle of the tube.  I don't know what the Beothuk did.  Maybe their quivers were a little longer, or maybe the sewers had smaller hands and arms than me.


I wanted to match a design element on the top of the illustrated quivers and used existing Beothuk Birch Bark baskets as the inspiration for the technique.  In her book, "A History and Ethnography or the Beothuk",  Ingeborg Marshall shows photos of decorated Beothuk birch bark baskets and says that the design was done like porcupine quillwork, but with spruce roots instead.  The designs look sewn in, but in reality, each portion of the design is a separate 2 inch section of root, inserted and folded in place.  I'm working the design into a sheet of bark that will then be stitched around the top of the quiver.

The birchbark sheet with the spruce quill work is shown in place here, although it hasn't been stitched on yet.  The pins are holding it in place.  You can start to see the overall look of the quiver.  There is still a fair bit more stitching to do, it needs some sort of shoulder strap added and then the whole thing will be covered in red ochre.  I'm looking forward to the final product.

I didn't quite know how to close off the bottom end of the quiver, but Lori gave me the solution.  I made a round disc and folded it around the edges, kind of like a coffee filter and inserted that into the bottom of the tube.  There is a small sapling ring holding it in place.  The light coloured band is another section of bark wrapped around the outside of the tube to add more strength to hold the stitches.  I tried sewing the bottom disc in place without that band and the bark started to tear.  If I would have continued, the bottom 3/4 of an inch of the tube would have just peeled off.  Adding the piece of bark with the grain running in the opposite direction seemed to give the tube enough support to stay in one piece.  

 Photo Credits:
1, 3-7: Tim Rast
2: Plate from Howley, James P. 1914 The Beothuck or Red Indians: The Aboriginal Inhabitants of Newfoundland. Cambridge University Press. Cambridge

Beothuk Quiver, Done and Drying

$
0
0
The base of the quiver with red ochre stain.  The
disc on the left is caribou leather that sits in the
bottom of the quiver to help protect the arrow tips
 and the bottom of the quiver.  The ribbon at the
 top is caribou raw hide for the quiver strap.
This isn't quite the reveal post.  The birch bark quiver is fully assembled, but in order to really call it a Beothuk reproduction, it needs a good red ochre stain.  I have two coats on, but as I write this, its still pretty damp, so I can't do the final photos to show the finished product, but here's a glimpse of the completed quiver in its unpainted state (below) and with an oil, water, egg, and ochre stain application (right).  The ochre will simultaneously colour the reproduction and add a bit of grit to the surface which helps antique the piece. I don't want it to be a thick red paint, however - I want the patterning of the birchbark to peak through.  So far, so good.  The stain is enhancing the patterns and textures.  I can't wait to put it all together once its dry.  Photos and more comments next week!
This is a view down the quiver from the open end.  You can see a small sapling bent into a ring and lashed around the upper lip to strengthen the opening.  I used a simple whip stitch, which was used by the Beothuk in the same way on their birch bark basketry.  On their very nice baskets the spruce root would be wound around the sapling between the whips so that the stick is completely encased in root.   I wasn't that ambitious and I wanted the sapling detail to be visible for interpretive purposes, so I left those spaces open.

Photo Credits: Tim Rast

Plans and Profiles: Claidhbh Ó Gibne Experimenting with Neolithic Watercraft in Ireland

$
0
0
Claidhbh Ó Gibne
Over the summer I exchanged a few e-mail with a fellow in Ireland named Claidhbh Ó Gibne who researches and builds traditional skin currachs.  He's undertaken an ambitious project to construct a larger ocean going vessel built using the same principles as the smaller currachs.  We know that Ireland's Neolithic inhabitants were part of a larger sphere of contact with Europe, but what do we know about their methods for making sea voyages 5000 years ago?  I asked him about his project:


Plans and Profiles #20. Claidhbh Ó Gibne Experimenting with Neolithic Watercraft in Ireland


1) Tell me a little bit about your project.

The Bovinda on the water
I have always been intrigued with the Stone Age, perhaps its because I have lived in an area where, 5,000 years ago, a great complex of burial chambers was built - known as Newgrange. This neolithic passage tomb culture travelled across from Europe to Ireland before the era of metal. They then continued to voyage northwards, settling in Orkney, north of Scotland where they strove to leave a legacy to their very existence in the form of a great passage tombs. The elephant in the room of course is the sea that lies between all the these countries and as a lure it was just too exciting not to bite. The other aspect of this, is the human story that tells of how we developed as a civilisation once we obtained a manageable food source, namely - the cow, which allowed us expand to the further corners of the world. This is what inspired the Newgrange Currach Project: the construction of a wicker framed, skin-covered boat used by mariners in prehistoric times. We plan to recreate ancient voyages that would have been undertaken by our ancestors over five thousand years ago. This 36 ft leather boat, Bovinda, was built as much as a trophy to salute human endeavour.while at the same time, as an acknowledgement that the cow today, is seen reluctantly as an archaic form of food production. Perhaps it symbolises the end of an era on the human journey and the beginning of this new voyage we seek to begin, that of renewal. (Hope that's not too deep!!)


2) How did you become interested in this particular problem?

The area where I live, along by the river Boyne, was one of the last places where woven skin boats were made to fish salmon, surviving on our river until as late as 1961, so I always had an interest in making these craft and reintroducing them onto the river. The question that all the archaeologists pose when talking about the tomb builders, is: How did our Neolithic ancestors transport such large stones from locations along the coastline which they used to ornate their tombs. When weaving our small traditional river boats, it became obvious to me that any shape or size could be made using this traditional method, and therefore I began to experiment with them.


3) Has your project changed since you began?

Bovinda sea trials
The swings and roundabouts associated with any project like this are so horrendous, that no one would have taken it on if they had known in advance. To answer whether my project has changed, yes...like a contortionist's performance out on stage, but like all good shows it worked its self out in the end. I would have liked to have used more raw hide in the construction and perhaps have had velum for the sails. A lot more experimentation is needed on leather tanning, especially natural sleeves of the lower legs of animals. I would have liked for the boat to have been smaller and lighter but I have had to add in a lot of extra support boughs due to its size. It quickly became apparent that the boat was to be double in size and have half the work force - as I said swings and roundabouts! The project was initially to be a woven imitation of the 36 foot Colmcille that is kept by the Causeway heritage group in Co Antrim. But a film documentary maker's imagination combined with a sailor's appetite always for more saw the project grow incrementally out of all proportion, least to say neither sailor nor film maker were there at the end.


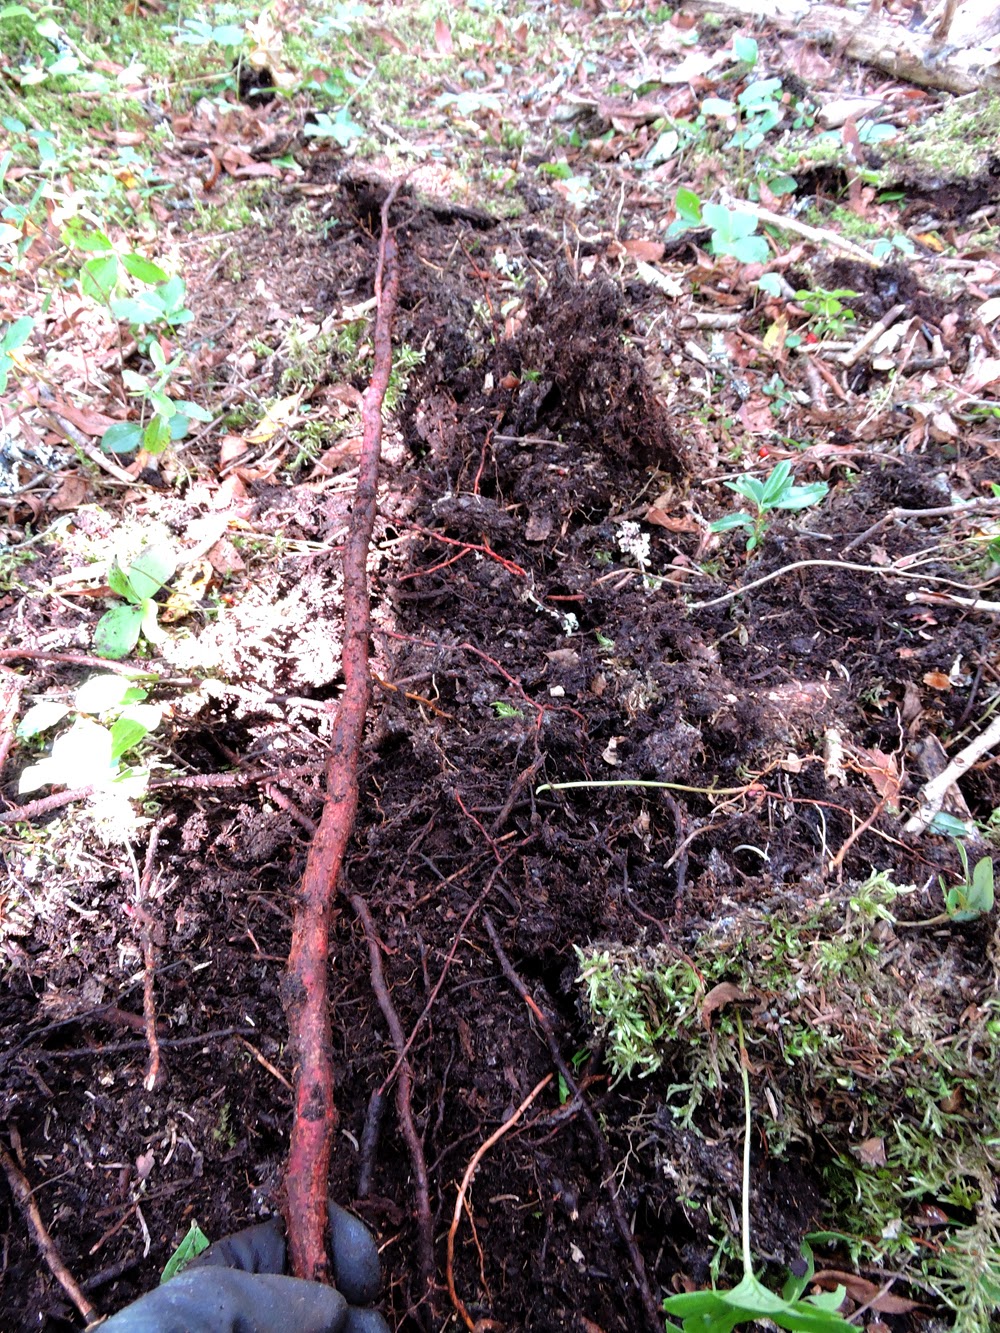
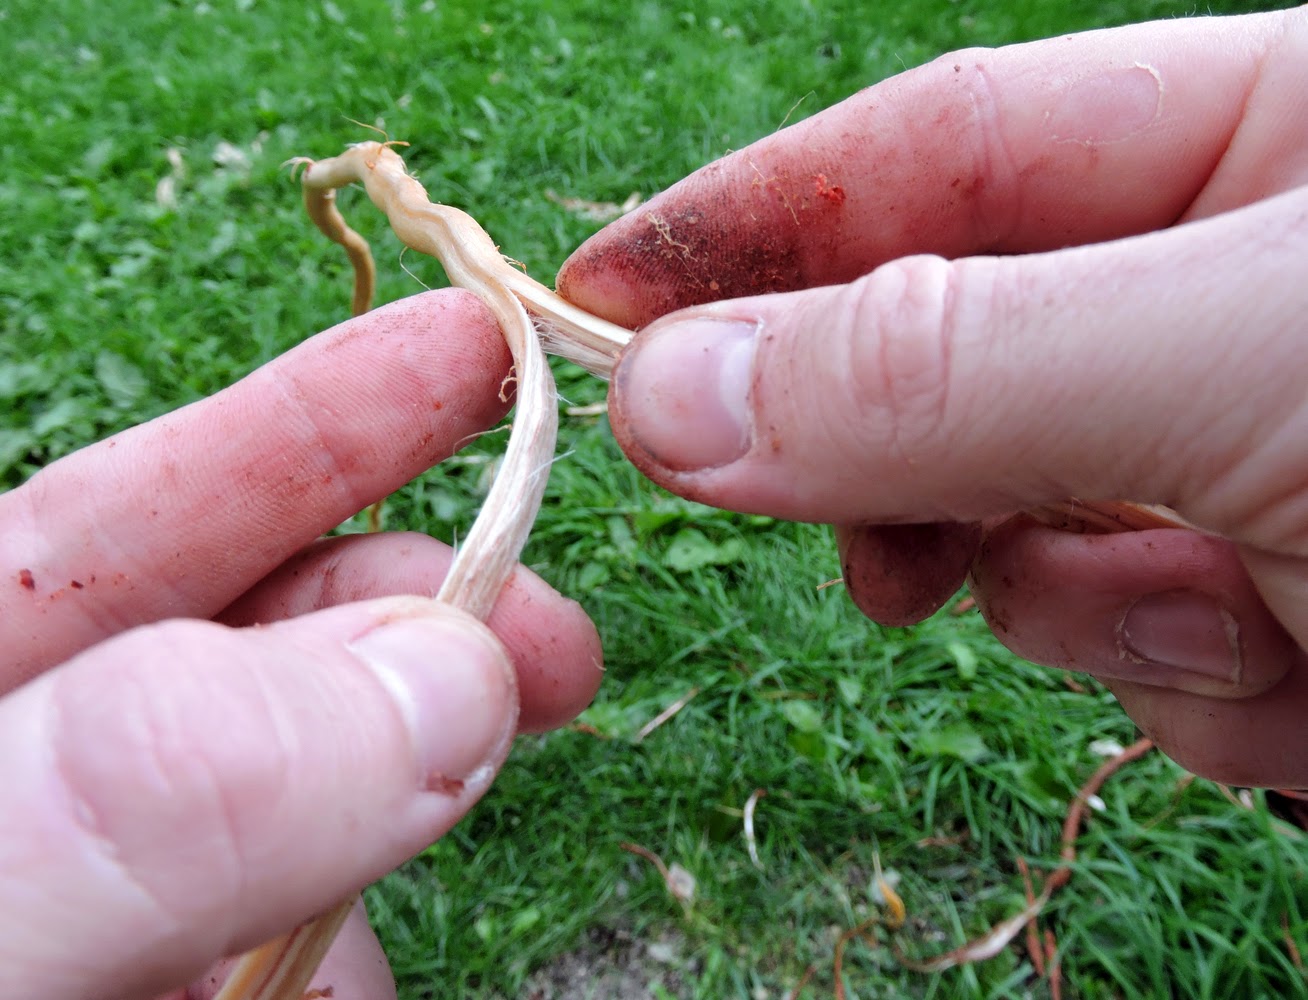
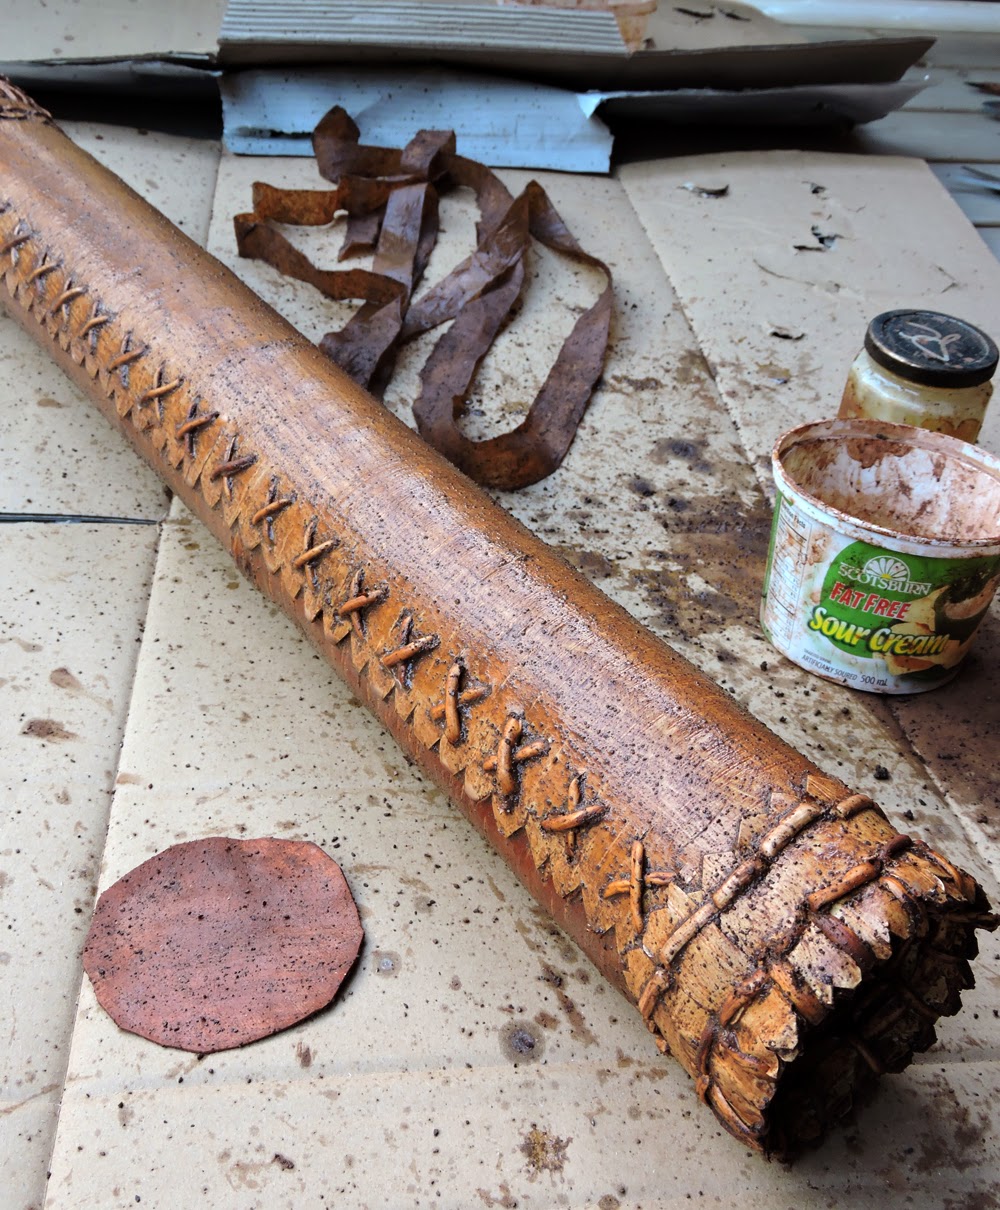
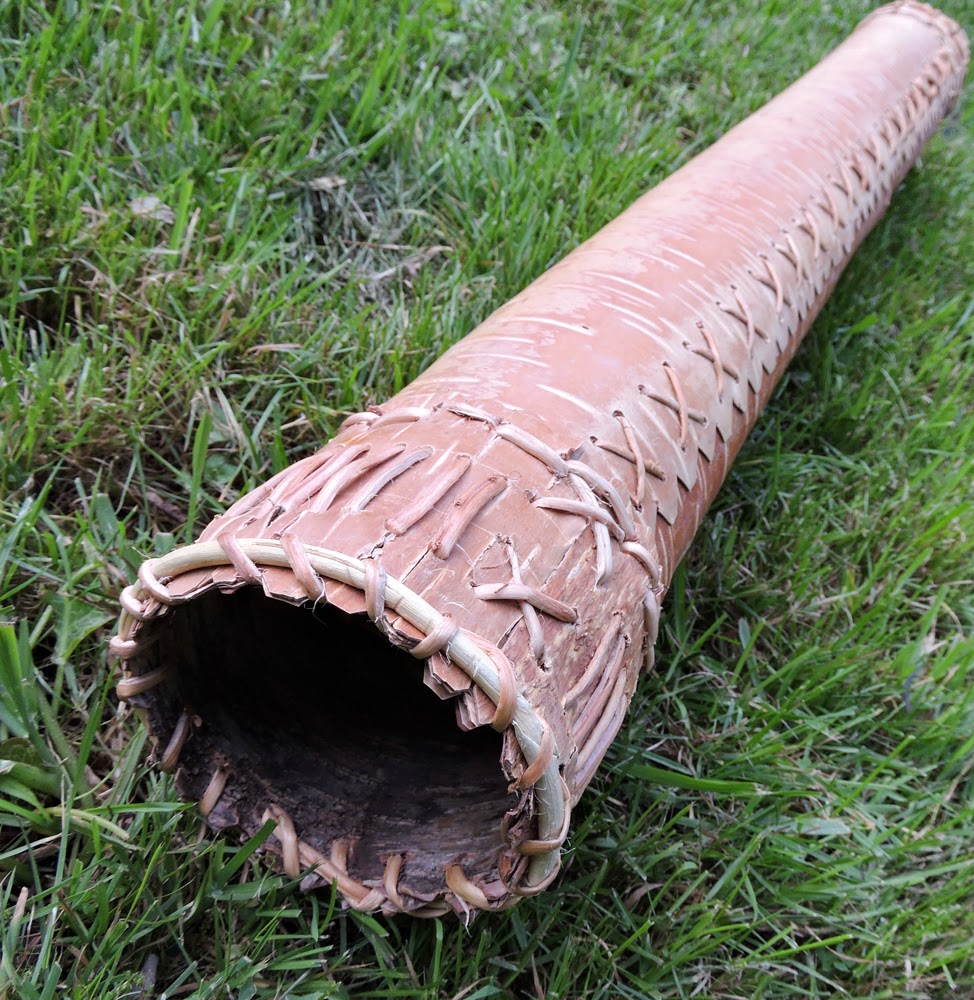
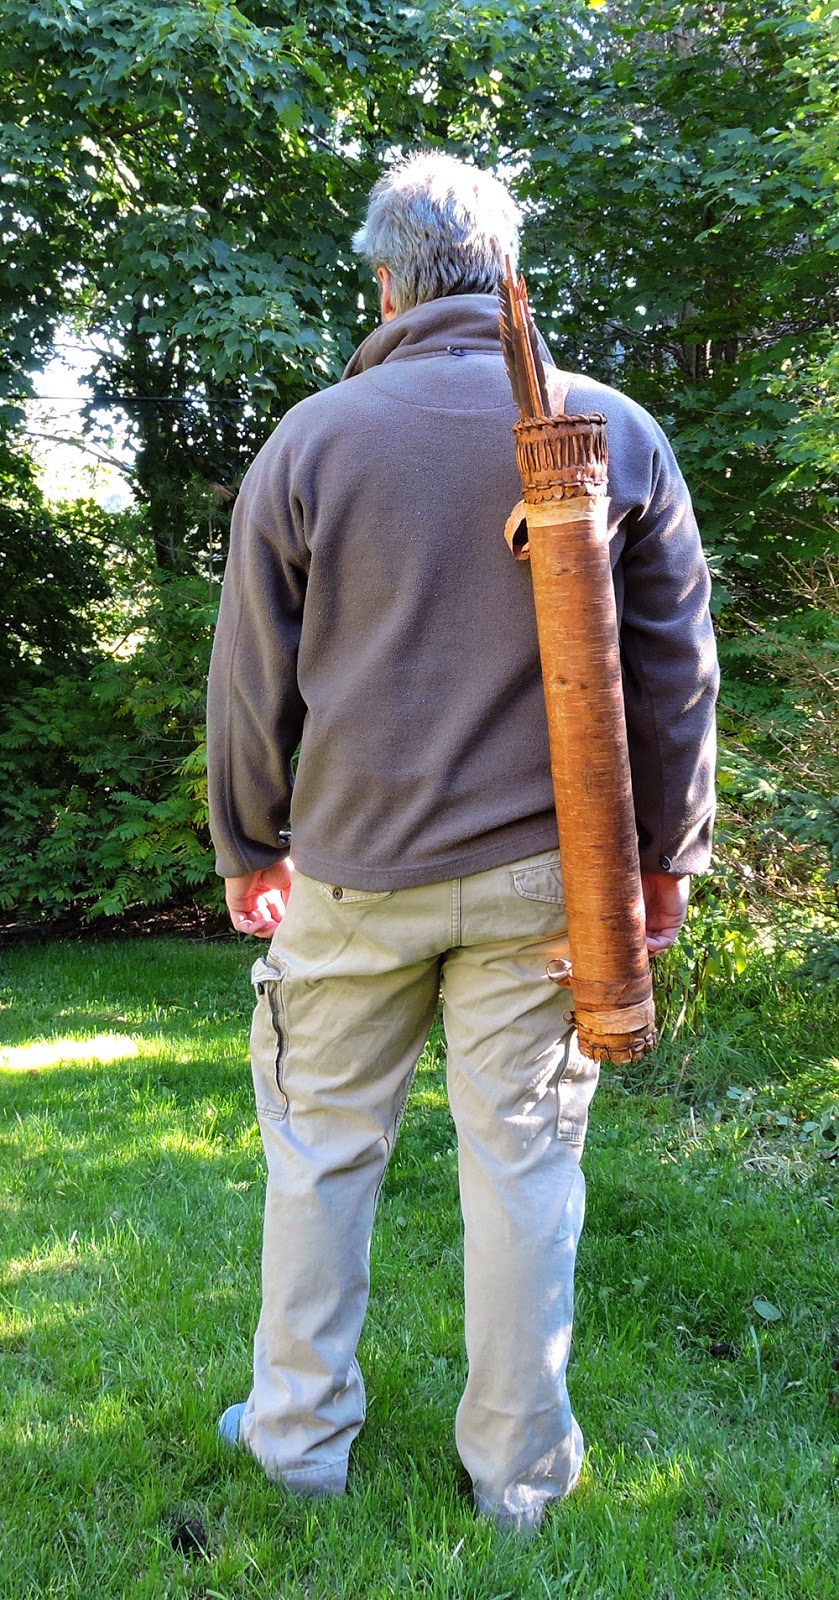
4) If you could ask a Stone Age mariner one question, what would it be?

I would ask him (or her) if they tonged or sewed the leather or skin onto their boats. If they tonged, I would ask if they used bird bone flutes to offer the rawhide thread through the holes? Or if they sewed I would ask what materials and tools was most successful for sewing with and if they ever came across an alternative to black spruce roots, as we don't have that over here! Ooops - think that's more than one question!! Basically, I would quiz them about their sewing techniques....I spent many many months experimenting with different materials and stitching methods before I settled on one!


5) Has your research taught you anything about yourself ?

Yes it has! I realise now how much I love a challenging journey, not too bothered about the destination, just the journey getting there!
Also I learnt that having no money for long stretches of time can hurt the hell out of your dignity, but not your pride!


6) How do you unwind when you need to get away from your research?

I like to unwind by playing music on my fiddle! And as this seems to wind everyone else up in the morning, I normally retire to the out doors with my cup of tea and play to the blackbirds. I like to meet up with friends and have fun on the river in our little leather boats, and the odd evening I get to play music with my sons and daughter who, being very good musicians manage to put up with me...only because I'm their Dad!!
Where I live, there are some beautiful walks at my doorstep and a dog who will always remind you. When the house is quiet, or when I manage to find a little corner for myself away from the busy bustle of the day, I love wood carving and I'm big into cultural heritage so carving Celtic design with knots as deep as I can make them is my favourite. I like to do illustrations and to draw Celtic designs which usually turns into a carving after some time, or yes, you got it, drawing detailed sketches of the boat. I get great enjoyment out of writing too!


7) What archaeological discovery or project do you wish you could have been part of?

Don't think a leather boat has ever been found but if ever there is such a find, thats where I would like to be, looking for answers to many of my questions, seeing how close I was to the real McCoy! So I would like to be on an Archaeological excavation working on a dig that uncovered a sea-going leather boat somewhere along the coast, in a nomadic settlement along side some middens!


8) What's next for you?


By next March, weather permitting of course, we hope to take Bovinda out again. The leather square sail is at present being improved upon and time permitting I will have a small leather lateen sail to experiment with too.. The oars of alder poles are at the moment being bent in the opposite direction in an attempt to straighten out the kinks. and I've had some time to experiment with two new quarter rudders made of elm and oak. So a lot going on and a lot to do -


9) What books or websites would you recommend if people want to learn more about your area of interest in general? Or your project in particular?

Of course I will recommend my own book for reading about skin currachs (Boyne Currach - from beneath the shadow of Newgrange, published by Fourcourts Press 2012). Other books that I would recommend would be Facing the Ocean by Barry Cunliffe, Sinews of Survival and Bark Canoes and Skin Boats of North America. With website we have a website www.boynecurrach.com and a face book page too! when I was researching about the boat I found that PaleoPlanet was the most helpful forum with many subscribers only to willing to give advise and suggestions.

===================================================


Are you part of an archaeological research project or perhaps you know an archaeology student who could use a boost in exposure. I'd love to hear your recommendations for future interviews. elfshot.tim@gmail.com

Photo Credits: 
All photos Claidhbh Gibne
Plans and Profiles Banner, Tim Rast based on a linocut by Lori White

Finished Beothuk Quiver

$
0
0
The Beothuk birch bark quiver reproduction is finished!  This will end up in a freshly updated exhibit for Dildo Island alongside the Beothuk bow and arrow reproductions that I worked on earlier this year.  The quiver is 74 cm long, with a top diameter of 11 cm and a bottom diameter of 9 cm.  Its made from a single sheet of rolled birch bark.  The original peel of birch bark was approximately 50 cm longer when I took it off the tree and the pieces cut from the ends were used as applique fringes around the top and bottom of the quiver.  All of the stitching is done with spruce roots.  There is no glue or modern binding materials used anywhere.  The stain is red ochre, water, linseed oil, and egg.  The strap is a strip of caribou raw hide ribbon about 2 and a half times as long as the quiver.  Its not permanently attached, but is long enough that it can be wrapped and tied around both ends of the quiver and adjusted to a number of different lengths.  I'm not certain how it would have been worn over the shoulder, across the back, or at the hip, so I wanted the strap to be versatile.

I'm not quite sure what to make of the bow-tie.  The only illustration that I have to use as a reference shows a ribbon-like strap tied around the top of the quiver and wrapped around the tube.  I think this is partly a cartographic liberty as the illustration accompanies a map of the Exploits River.  I don't know whether to take the bow-tie literally, but what I did take away from the drawing was the approximate width, weight, and exaggerated length of the strap.  It also gives the impression that the strap was not permanently fixed to the quiver, but wrapped around and tied in place.  I tried to capture the feel of the ribbon-like strap by using a strip of thin caribou rawhide.  Overall, I like the weight of the strap, the paper-like quality of the strap suits the cardboard-type weight of the quiver itself.

Here's the reproduction next to the original reference drawings.  There are things that I like about it, but I can also see a few things that I might modify in future quivers.  The conical taper could be a little sharper.  The width at the top looks good, but it could be a little narrower at the bottom.  I'm happy with the stitching details at the bottom of the quiver, although I might try stitching across the bottom in a sort of star or spiderweb pattern with the spruce roots next time.  I have that sort of stitching inside the bottom of the tube to hold some extra birch bark discs in place at the base of the quiver to protect the bottom of the tube from the arrow points.  The stitching up the side looks good, although I might make it just a hair smaller and tighter in future builds.  Incidentally, this is the first time that I've notices how the Beothuk arrows are shown with their fletching extending past the nock on the end.  I've looks at this image a dozen times and never noticed that detail before.  I'll need to modify the fletching on future arrows.

I'm not sure how many arrows you'd want to store in something like this.  If you wanted to cram as many in as possible, then you could probably fit a couple dozen in, maybe more.  But to actually access them easily, then perhaps a dozen or so would be more practical.  The tapered points made from hammered iron nails would be much easier to withdraw from the tube than the earlier barbed stone points.  In terms of keeping the arrows dry  - there is no indication in the reference drawings of any sort of flap or cover.  I didn't seal any of the holes for stitching the the spruce root through the birch bark, so water should drain out the bottom without too much trouble if you got caught wearing it in a downpour. Birchbark is naturally waterproof and the ochre and oil staining will only help make it even more weather resistant.

Before the ochre went on, the birch bark seemed bright and fresh and new. 

The ochre stain adds a lot of depth and character to the reproduction.  I think a person's first impression might be that its a leather quiver, but if you look closely you can see the telltale birch pattern beneath the rich red ochre staining.
Photo Credits: Tim Rast

How to wear the Beothuk quiver?

$
0
0
I don't know how the Beothuk wore their quivers.  Judging from Cartwright's illustration, it looks like the quiver strap was very long and not permanently fixed to the birch bark tube that held the arrows.  This makes me think that the quiver was adjustable and could have been worn any number of ways across the back, over the shoulder, or at the hip.  I'm not going to pick a most likely scenario, but here are a few options that come to mind.  In each version the strap is tied around the top and bottom of the quiver and either left at its full length, shortened by one additional wrap around the tube, or shortened by two additional wraps around the tube.  The version shown worn at the waist is looped through an additional rawhide strip acting as a belt around my waist.

With a very long strap the quiver
could be worn low across the back.
This style makes sense if you
imagine it worn over a large winter
robe.
With a short strap the quiver could be
worn at the waist on a belt.  You could
get a similar effect with the very long
strap hung over the opposite shoulder
like a sachel.


Slung over one shoulder.  Fine
for short distances, but
probably not the most secure or
practical option in most cases.
Worn diagonally across the
back, the quiver is secure,
the arrows are easily accessible
and they aren't in the way for
walking through the woods.


Photo Credits: Lori White

Late Dorset Biface and Cover

$
0
0

This is an interesting pair of Late Dorset Palaeoeskimo artifacts from Button Point, Nunavut.  I saw these in the spring at the Canadian Museum of History while Chris, Lori, and I were looking at Dorset drums.  I can't say for certain that these two objects belong together, but they are a good match and illustrate how the carved wood covering might have fit over an endblade, knife, or lancehead.  


The upper artifact is a chert biface and the lower object is a wood covering that is designed to fit over the same style of point.  I think its probably a protective covering to protect the sharp edges of the biface between uses.  Although it is carved to a sharp point itself, so its not impossible that it is a functional wooden lance head designed to fit over an existing stone point.  I think the sheath option is the more likely scenario, but you never know.  The Dorset threw away their drills and didn't want hoods on their parkas.  It wouldn't surprise me if they decided that knapped stone tools made life in the Arctic too easy and decided to cover them up with really, really sharp wood instead.


Photo Credits: Tim Rast
Courtesy of the Canadian Museum of History

On Vacation

$
0
0
Flying over the Austrian Alps on the way to Italy
 Photo Credits: Tim Rast

Atrani, Italy

$
0
0
Home for 10 days
Atrani, Italy
Photo Credits: Tim Rast

Amalfi, Italy

Pontone, Italy

$
0
0

View of Pontone from a garden in Ravello, Italy

Photo Credit: Tim Rast

Isle of Capri, Italy

$
0
0
Leaving Capri


Photo Credits: Tim Rast

Pompeii

$
0
0
We visited Pompeii on our way off of the Amalfi Coast and north through Florence and into the Dolomiti Mountains.  The scale of the excavations and ruins at Pompeii is something that I wasn't prepared for.  The town had a population of around 11,000 people when it was destroyed by the eruption of Mount Vesuvius in AD 79.  The town that I grew up in had a population of 2000, and the homes and businesses were spread over a comparable sized area to Pompeii. Archaeological excavations at Pompeii over the past 250 years have exposed most of the town.  Our visit lasted from mid-afternoon until sundown.  At night it was pitch black and without a GPS and our iPhone flashlights we might have still been stumbling around the streets when the packs of stray dogs inhabiting the town began to rouse and prowl the empty streets.


Photo Credits: Tim Rast

Ötzi in Bolzano, Italy

$
0
0
Ötzi - reconstruction
One of the highlights of the Italy trip was heading north towards Bolzano on my 40th birthday to visit the South Tyrol Museum of Archaeology - the home of Ötzi - the Iceman.  Ötzi is a 5300 year old wet mummy that was found frozen in the Tyrolean Alps in 1991.  Not only was his body preserved, but many of the tools that he was carrying with him as well.  The museum does not disappoint.  Ötzi's mummified body is on display in a cooled room, behind glass.  The window into the mummy room is the first display that you see when you enter the exhibit space.  Then all of his tools are beautifully presented and interpreted.  Photos are not allowed in that part of the museum, but you can seen wonderful photos of the artifacts on the museum website (link above). Photos, however, are allowed in other parts of the museum, including the fantastic reconstruction of Ötzi and a lifesize, interactive touchscreen autopsy table that lets you examine the mummy inside and out.

The outside of the museum in scenic Bolzano.


The touchscreen autopsy table let you zoom in and see different layers or bone, muscle, and tissue inside the mummy.


Ötzi's big hands and his farmer tan reminded Lori and I of my dad's hands as soon as we saw them.  Its a remarkably lifelike reconstruction of a man who made his living with his hands.


 Photo Credits: Tim Rast, Lori White

Happy Halloween

$
0
0
A creepy statue in Venice - how does stone decompose like that?
 
Apparently Cenobites lie behind this doorway in Venice.
Yeah, that's grim. Castelvecchio Museum, Verona

Creepy kid and her creepy drawing.  More nightmare fuel in the Castelvecchio.
Photo Credits: Tim Rast

I bought a wallet in Florence and lost all my money.

$
0
0
Our merry band of travelers at the arena in Verona
We're finally back home after our three weeks in Italy.  It was a great trip.  We spent the first ten days on the Amalfi Coast in a fantastic villa in Atrani.  After that, we traveled by train to Pompeii, Herculaneum, Florence, Bolzano, Venice, and Verona.  On our last night in Verona, I checked my bank account and was shocked to see that for about a week someone had been taking cash out of my account.  Apparently, when I tried to withdraw cash in Florence, I put my card into an ATM with a device that copied my card and recorded my pin code.   I tried three machines that day and I got errors from all of them when I tried to use my bank cards.  I didn't think much of it at the time because I was in another country trying to access funds in Canada, so I expected hiccups.  Finally I had success with taking money out of a machine using my VISA, rather than a debit card. Three days later someone in Peru started making ATM cash withdrawals from my CIBC chequing account.  They got about $1300 before I noticed it.  My account was almost empty and the withdrawls would have ended soon on their own, but I just happened to have a GIC cashed and deposited into the account that day that would have given the thieves access to thousands of dollars more.  In our hotel room in Verona, I called the International CIBC number on the back of my bank card and cancelled the card.

At least one of the ATMs that I tried
in Florence was in this square. Ironically,
my souvenir from Florence was a new
leather wallet.  Not that I have any money
left to put in it.
CIBC launched an investigation and within about 24 hours the money was returned to my account.  The customer service was fantastic, and ten minutes after realizing that I'd been robbed, I was confident that I'd get my money back and we enjoyed our last night out on the town.  I had checked my other accounts at the time and the CIBC account appeared to be the only one affected.  However, when I got home to St. John's my Soctiabank account was suddenly showing a negative balance.  I checked with a teller in the branch and sure enough, the Peruvian bandits had my Scotiabank info too and had emptied out another $1000.  Scotiabank deals with fraud on a debit card different than CIBC, so I'm still waiting to have those funds reimbursed.   To be safe, CIBC suggested that I preemptively cancel my VISA, just in case it was compromised.  Scotiabank investigates fraudulent transactions at the branch level, while CIBC has a special national unit dedicated to exactly this sort of theft.  I'm glad I dealt with CIBC first.  I have less confidence in the Scotiabank system, although I'm sure it will all work out fine in the end.

Verona at night.  (Click to Enlarge)
Photo Credits: Tim Rast

Elfshot News

$
0
0
Flintknapping for Arch 2480
Earlier this week I did a flintknapping demo at Memorial University of Newfoundland for the Archaeology 2480 students.  The instructor, Amanda Crompton, took this photo and submitted a brief write-up to the department website, which you can view here: Archaeologist Tim Rast demonstrates flintknapping techniques to students.  If you're in St. John's you may recognize Amanda's name because she is giving an NLAS talk at The Rooms next Wednesday evening (Nov 12, 7PM) called "FINDING THE CHAPEAU ROUGE: THE HISTORY AND ARCHAEOLOGY OF FRENCH SETTLEMENT IN PLACENTIA BAY BEFORE 1720", and if you're a member of the Canadian Archaeological Association, then you may recognize Amanda's name as the Conference Chair of the 2015 CAA Conference being held in St. John's at the end of April.  

Me and my camera
Speaking of the CAA conference, I have some overdue news to report from the 2014 Conference held in London, Ontario.  I won a Canadian Archaeology Association YouTube Award! Its for the video clips that I made last spring talking about the Dorset Palaeoeskimo drum reproductions and the sequence of markings that adorn the drum frame. I was nominated by Matt Betts and the award was sponsored by the Canadian Museum of History.  I wasn't able to attend the conference for the announcement or to receive the prize, which was waiting for me in a pile of post-fieldwork and post-Italy mail.  The awards committee let me know about the prize shortly before the conference, which was when I was gearing up for the field, so I pre-emptively spent the prize money on a new camera.  It seemed appropriate, since my last camera died while I was visiting the Canadian Museum of History in the spring to research the Dorset drums.  I bought a Nikon Coolpix P600 and I've used it to take almost all of the photos shown on this blog since June. 


Photo Credits:
1: Amanda Crompton
2: Lori White
Viewing all 437 articles
Browse latest View live