Quantcast
Channel: Elfshot
Viewing all 437 articles
Browse latest View live

Dorset Palaeoeskimo Drums from the Canadian Arctic

$
0
0
Examining the drum features and
decorations under magnification
We're back home now and I'm going through notes and photos from last week's visit to the Canadian Museum of History with Chris Wolff.  We were there to view Late Dorset drums recovered from Button Point on Bylot Island off the north coast of Baffin Island, Nunavut.  The artifacts from Button Point were salvaged by Fr. Guy Mary-Rousselière, a priest in the nearby community of Pond Inlet.  The artifacts are stored in the Canadian Museum of History in Gatineau and have been catalogued, displayed, and studied over the years, but there is not a lot of primary documentation accompanying them.  Its an incredible collection that would make a fantastic project for a graduate student.

The Canadian Museum of History

Some of the drum fragments 
We knew that there were two small, nearly complete drums in the collection along with hundreds of other artifacts, but we didn't realize that there would be fragments from more than a half dozen other drums as well.  In total, we recorded 13 additional drum frame fragments in addition to the two near complete drums that we were expecting.  It is possible that some of the fragments would have fit together so we can't say that we found 13 additional drums, but given the variability in the widths, thicknesses, and design details it looks like they represent at least 7 or 8 more drums than we were expecting.  Many of these fragments were identified as drum frame parts in the catalog, although we did add a few new pieces to the sample that were previously unrecognized as drums and we raised some questions about a couple of pieces that we felt may have been mis-identified as drum parts in the past.  Those questionable pieces aren't included in the photos here.

All of the wood pieces that we felt confident in calling drum parts

This drumframe may look incomplete,
 but we are confident that it has just
expanded open from a small 15cm
diameter hoop.
I was most interested in seeing the incised marks on the drum frames.  I've mentioned the sequence of tick marks carved into the frame of the most complete drum in previous blog posts, and alluded to the presence of tick marks on the other nearly complete frame.  This was my first opportunity to see those marks in person and I was thrilled to see a second complete sequence of marks on the second frame.  I'm not going to spoil our paper by telling you what the other sequence is or the surprising artifacts that we saw similar sequences appear on, but I will say that several of the other drum fragments also had similar tick marks on the frames.  Those incised lines seem to have been a common design element on Dorset drum frames and other artifacts in the Button Point collection and I think their placement and order is loaded with meaning.  When we viewed the Inuit drums in the ethnographic collection we didn't see any incised marks on the frames.

The incised lines are very easy to see.  Here are the two sets of 8 tick marks with the line running through them that transforms them into a skeletal motif, or stylized representation of a spinal column.
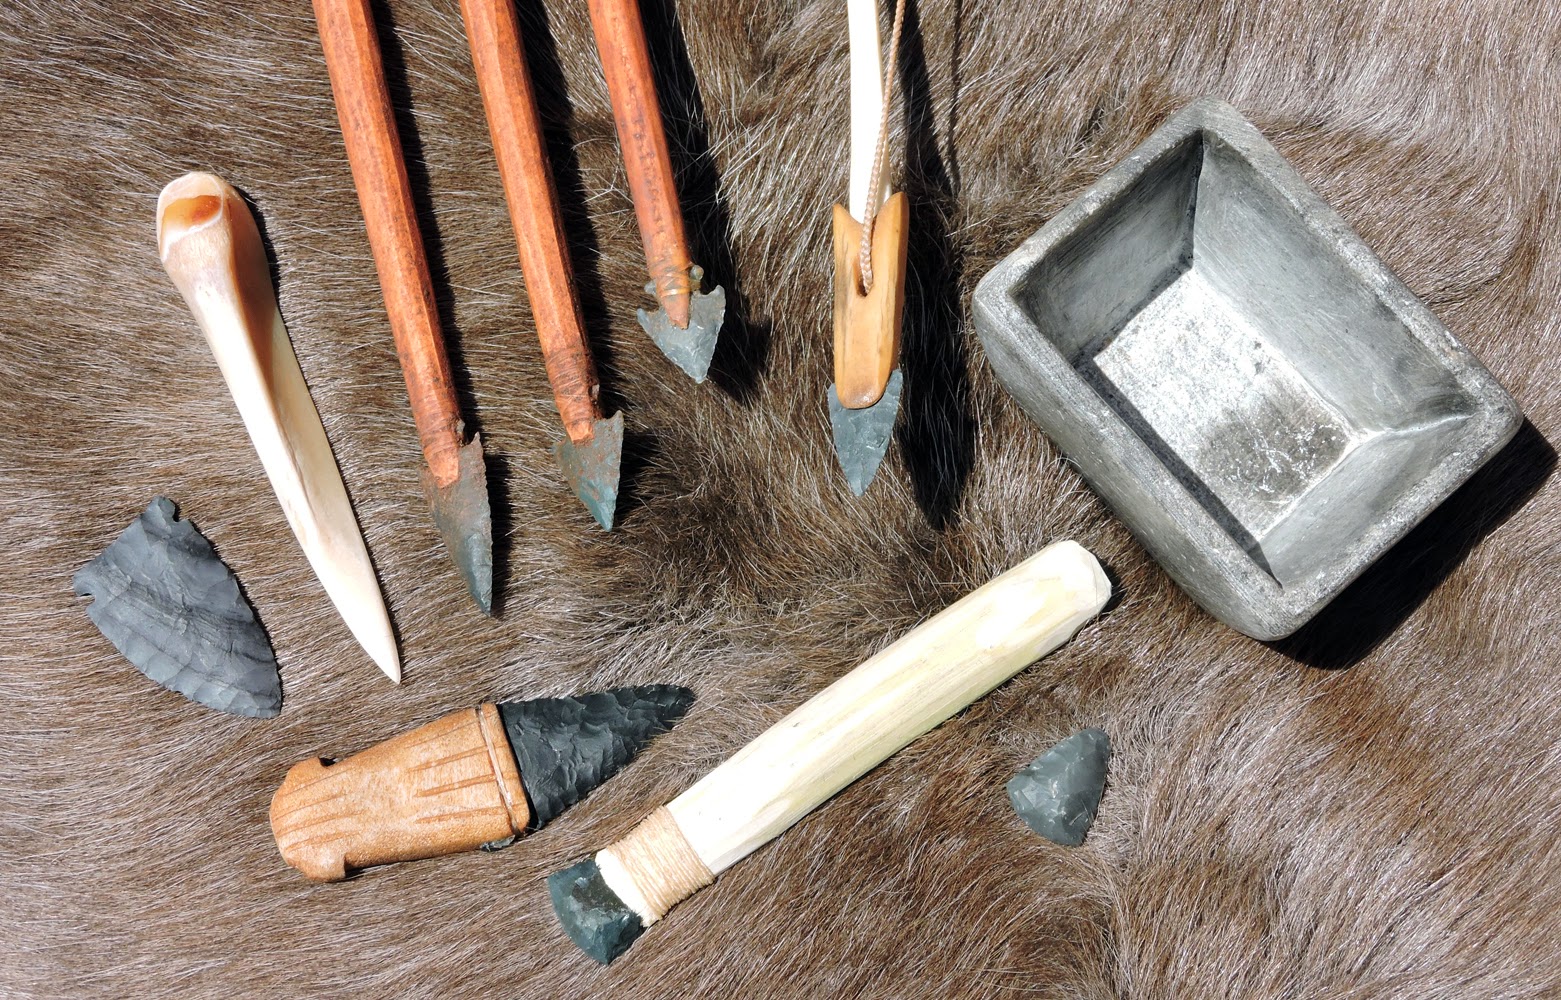
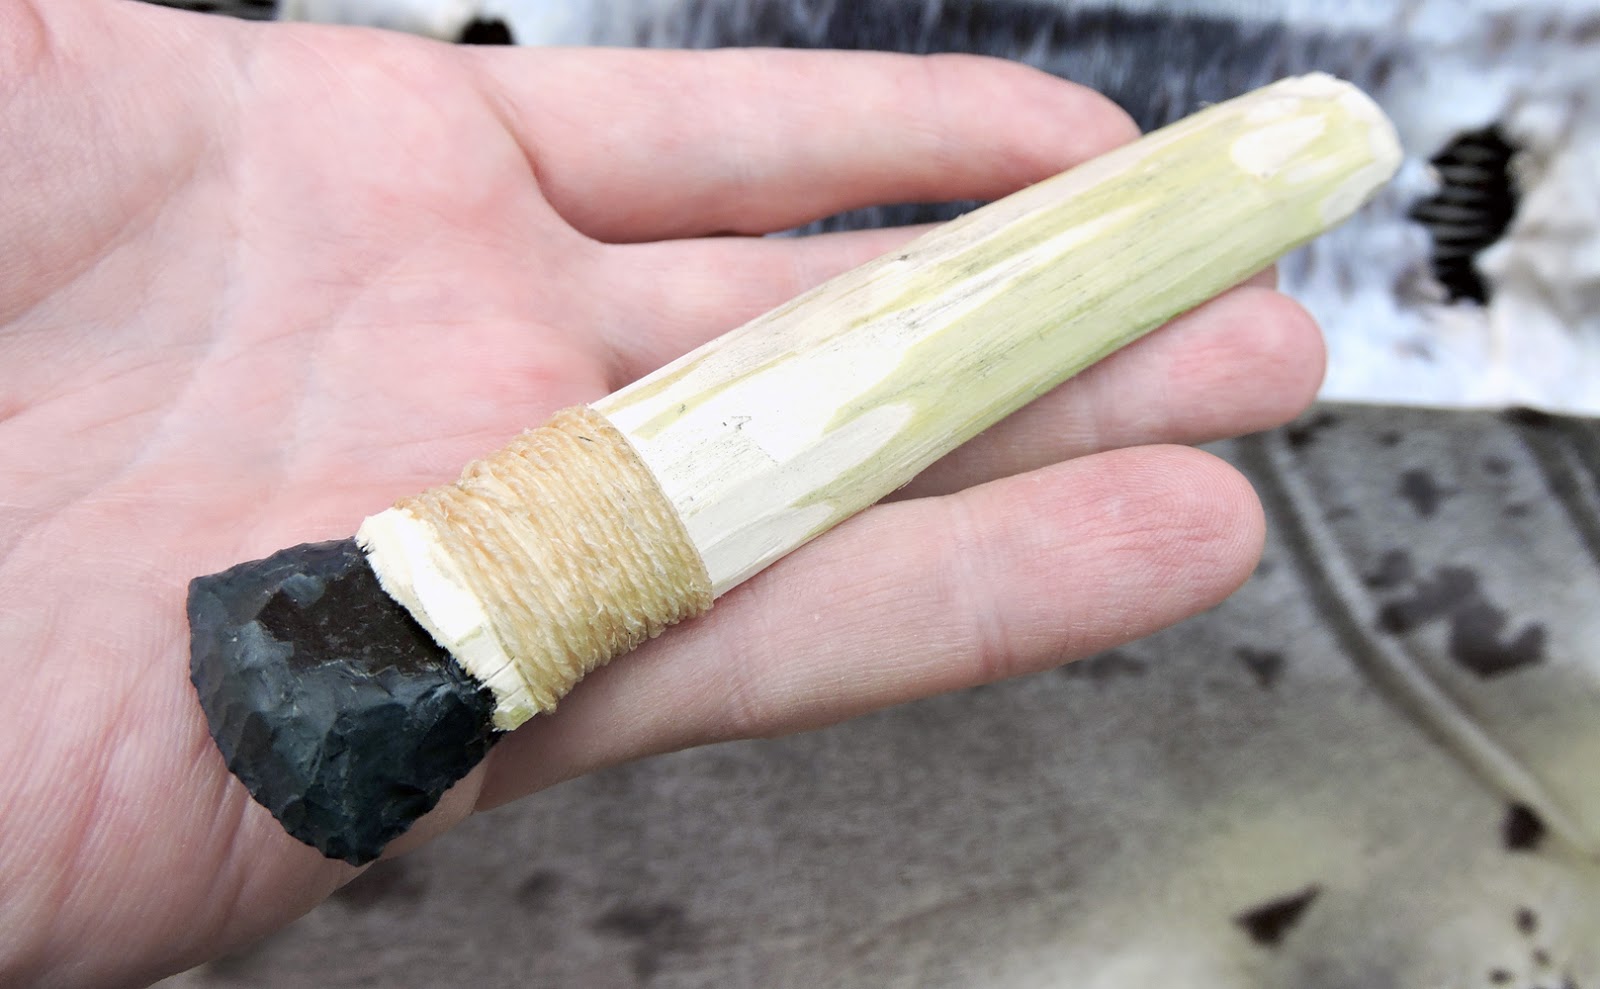
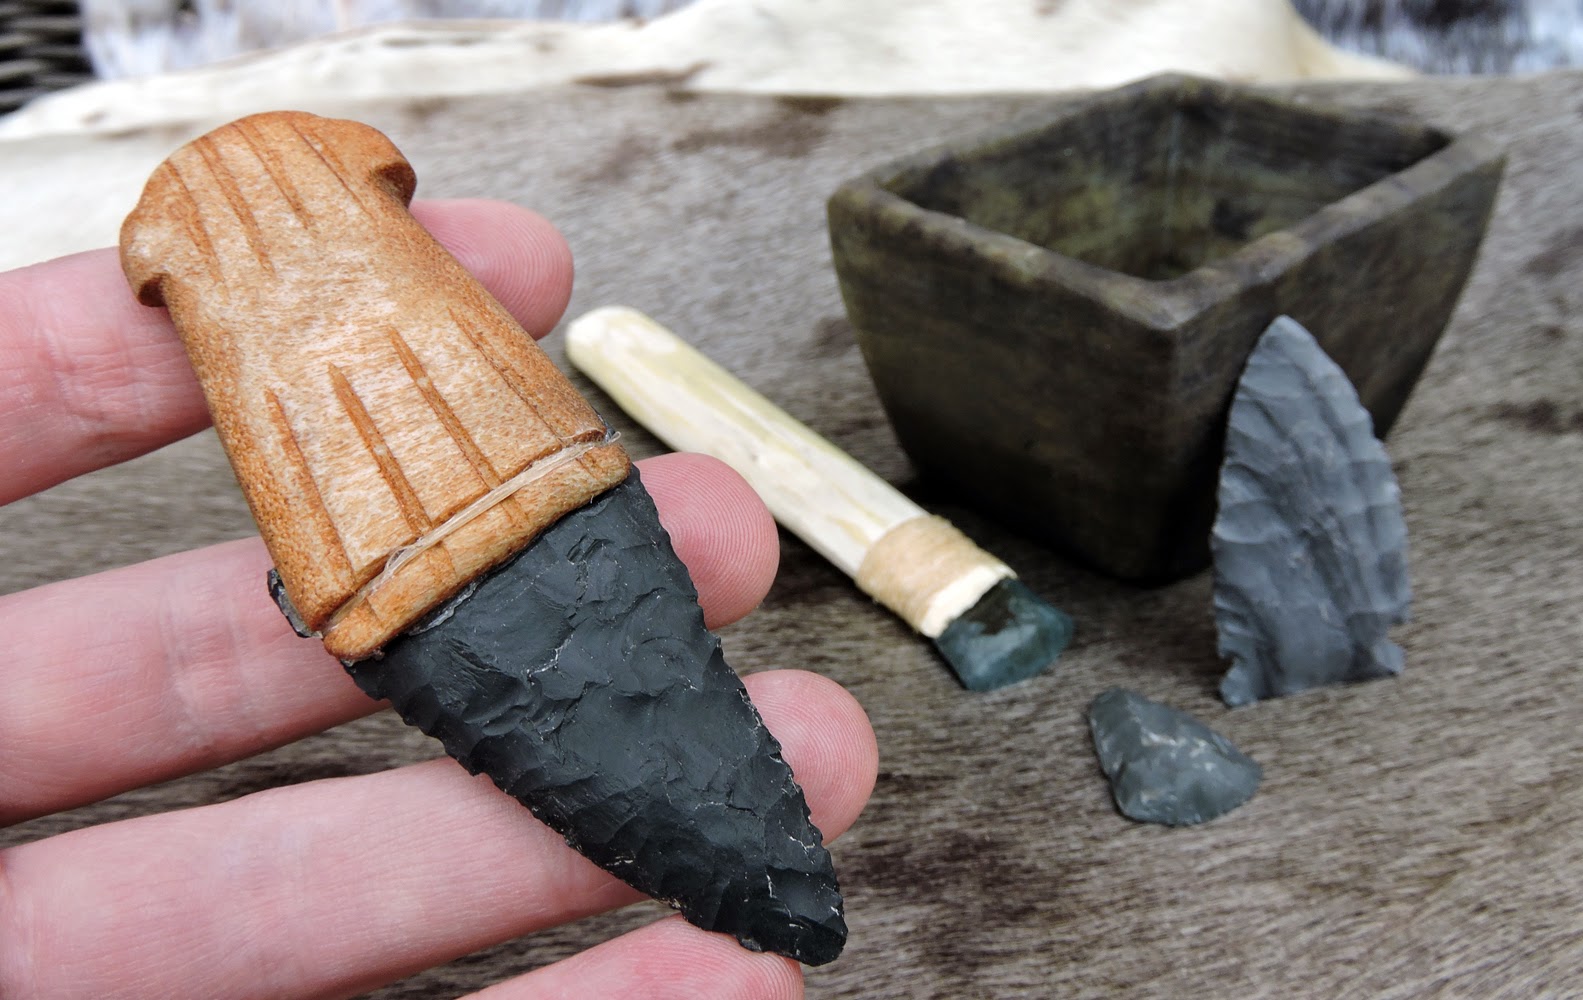
The reproduction beside the original.
I trimmed the handle down a bit after
seeing them side by side.
There were obvious correlations between the Dorset drums and the Inuit drums that we saw, but there were just as many distinguishing features in the drum manufacture and design that were consistent in all of the Button Point drums and drum fragments but were absent in the ethnographic drums.  I mentioned some of these design elements previously when I documented building the drum reproductions earlier this winter, but it was encouraging to see them appear so consistently across the larger sample.  Things like having the drum skin rest on a beveled, rather than square edge, do not seem to be peculiarities that are unique to one or two individual drums, but consistent features that were common to Dorset drum making more than a thousand years ago on northern Baffin Island.   Chris' experience as a drummer lent some insight to why this beveled edge might be significant and we have an experiment in mind to test the theory.  The gouged holes on the complete frames also showed up on many of the fragments, but were absent from the ethnographic drums in the collection.  We're still working on figuring out the function of those holes, but we noticed a few interesting things about their style and placement that we can report on in the publication.

All of the Inuit drums in the ethonographic collection had handles lashed to the outside of the frame.

The two Button Point drums that had their handles intact had them inserted through gouged holes in the frames.  Many of the smaller drum fragments that we saw had similar holes gouged through them, although not every gouged hole would have been suitable for a handle.  There were also additional holes on the complete frame that must have served other purposes.  We saw holes on the ethnographic drums that were used to tie the frame together or to tie the skin into place, but they didn't look the same as the holes on the Dorset drums.


All in all, it was very exciting.  I think there are some very interesting things that we will be able to say, not only about the mechanics of Dorset Palaeoeskimo drum making, but about how these drums fit within Dorset society and religion, and how they may be related to other drumming traditions in the Arctic.

Photo Credits: Tim Rast and Lori White

Marking Beothuk Reproductions

$
0
0
Pencil on bone
I'm back in the studio, working on Beothuk reproductions.  The photos in this blog post show a few bone gaming pieces and pendants roughed out and marked up for carving.  The gaming pieces are made from long bones and the pendants are cut out of caribou mandibles.  I've drawn designs on them in pencil based on actual artifacts and tomorrow I'll incise the designs so that when they are covered in red ochre the carved designs will stand out.  Most of the Beothuk designs seem to be abstract.  If they had meaning, they are forgotten.  I spend a lot of time counting lines and hatch marks to transfer the designs by hand from the artifacts to the reproductions.  The closest thing to a pattern that I've seen seems to be related to methods for filling up space on the object's surface rather than marking out something more abstract like measuring time or distance.

Adding a line midway between
two existing lines is an easy way
to evenly fill up a space.  Its
exactly the same idea as the
fractions within an inch on a ruler,
except each mark isn't exactly 1/8
or 1/16 of an inch wide - the
spacing changes depending on
how far apart you space the first
two marks.
The patterns on the objects seem to be easiest to reproduce by working from the edges inwards.  Most of the pieces have border lines incised around the edges of the piece.  Whether they are square gaming pieces or more triangular pendants, the first step is to define the outer limits of the pattern and then proceed to divide up the internal space.  The internal space is usually divided into halves and then more details are added symmetrically inside those internal divisions.  Its not always the case, but often when I count the lines covering a space they make sense if you approach the design with the goal of systematically and evenly filling up the internal space in mind.   The designs start by delineating the maximum boundaries and then subdivide the internal space again and again.  Is that a fractal?  Or maybe a reverse fractal? Kind of, I guess.   Its easier to understand what I mean if you look at the sketch on the left.  In the top row, I've drawn two lines to show the edges of the space that I want to infill with marks.  In the second row, I've added one more line half way between them which leaves three lines in total, evenly distributed in a row.  In the next line, I've added a mark in between each of the three lines to create five evenly spaced marks.  Using this method it is easy to fill up a space of any size with equally spaced lines.  In turn it leaves behind sets of the same number of marks over and over again.  I haven't done the math, but my impression is that sets of five, nine, and seventeen marks or lines show up on Beothuk carvings more often than other numbers.  More than random, at any rate.  As a variation on this, you can add two marks (instead of a single mark) between a pair at any stage, which leaves a different, but still repetitive, sequence of numbers.  When I copy a design onto a reproduction I think about how I'll copy and scale the design to fit the space and more often than not I can use a simple formula like this to get the same number of evenly spaced marks as I see on the original.  If it works on the reproduction, it makes me think that maybe similar methods were used to create the originals.

On these tiles, the patterns might look random or complex at first, but at least some of the designs seem to be based on sequences of numbers that are easy to explain if the carver set out to systematically fill the space quickly and evenly with marks or dashes.  For example - the tile with the "H" in the middle has a border on the right side with seventeen diagonal dashes in it.  Its very easy to place seventeen evenly spaced dashes into a given area simply by adding lines in the gaps between previous lines (see the drawing above.)  The gaming piece in the upper left corder with the grid on it is even easier.  It has two sets of nine lines running across it, which can be drawn by adding parallel lines between two lines three times in a row and then crossing it at 90 degrees with one set of five lines running lengthwise (which can be made by adding a line between two lines twice).  
There may be meaning behind these symbols and designs, but I really get the feeling when I make them that they are the result of creatively applying some very simple rules 1) define the edges of the design, 2) divide it down the middle 3) fill in each half symetrically with evenly spaced lines, dashes, and triangles.  No two pieces are ever the same, but they all seem to be made following the same design principles.  
Does any of this make sense?  I feel like I've taken a very simple idea and explained it in the most complicated way possible.

Photo Credits: Tim Rast

Staining Beothuk Reproductions

$
0
0
A first coat of ochre
and oil
 I'm finishing off the week by staining some Beothuk reproductions.  I need to ochre stain some pendants and gaming pieces and try to get some rust and age on a few nails.  I need to pull together an assortment of old fashioned square cut nails to show the sort of nails that the Beothuk were scavenging from early European sites in Newfoundland.  Right now I have three different sizes and vintages of nails ranging from antiques to newly made nails and I want them all to look more or less contemporaneous.  I'm starting by staining them in tannic acid made from tea.  I'll see what they look like after a soak overnight.  I imagine I'll wind up taking a hammer and blow torch to them as well.  Hopefully that will be enough to blend them into one coherent batch.  If not, there's still muriatic acid.

The carved pattern is nearly invisible on the unstained bone, but once the ochre goes on the lines start to pop.

Tea staining the iron nails.  You can see a few little shiny nails in the mix, I want to antique those so that they match the bigger rusty nails.

Ground ochre and oil for the bone pendants and gaming pieces.
Photo Credits: Tim Rast

NLAS Skills Workshop: How to Report an Archaeology Site

$
0
0
In the first of a series of Archaeology Skills Workshops presented by the Newfoundland and Labrador Archaeological Society, Steve Hull will present "How to Report an Archaeology Site." Steve works in the Provincial Archaeology Office.  He edits the Provincial Archaeology Office Annual Review and is the man behind the award winning "Inside Newfoundland and Labrador Archaeology" blog.  

This workshop is open to anyone 16 years of age and older, regardless of your archaeology background.  Steve will cover everything from what to do it you accidentally find an artifact to how to correctly fill out Site Record Forms.  The workshop is geared especially towards members of the public with no formal archaeology background and archaeologists in training who may not have held a permit or reported a site yet, although anyone with an interest in archaeology in the Province can get something out of it.  I plan to take it as a refresher on the permit paperwork in the Province and the Historic Resources Act.  I want to know exactly what advice I should be giving to people when they come to me with an artifact that they have found.

Instructor: Steve Hull (Provincial Archaeology Office)
Place: QC-2013 (Queen's College, MUN Campus, St. John's)
Date: May 18, 2014 
Time: 1-4 PM
Price: $10 for NLAS members, $35 for Non-members

Please RSVP by e-mail to nlas@nlarchsociety.ca

Photo Credit:NLAS Poster

Our NLAS CafePress order arrived!

$
0
0
The first order from the new Newfoundland and Labrador Archaeological Society CafePress Shop arrived yesterday afternoon.  This was my first time ordering anything from CafePress, so I wasn't sure what to expect.  I'm really happy with the quality of all the products.  Lori got a canvas tote bag and a 1 litre sigg water bottle. I got the same water bottle and a hat.

The NLAS will be rolling out new products from time to time, but there is already a lot to choose from.  I'd certainly recommend the water bottles and canvas bags to friends.  The hat is a good quality hat, but there's something about a transfer print on a hat that looks a little flat.  We'll get embroidered hats sometime, but for now, if the printing on the t-shirts is anything like the printing on the bag, then I'd say get a t-shirt instead.  I'm really happy with this shop and Catherine Jalbert and the NLAS events committee deserves a big pat on the back for this.  The NLAS share of sales from the shop goes towards sponsoring our upcoming talks and workshops; like the Archaeology Skills Workshop: How to Report an Archaeology Site coming up this Sunday, May 18th.


Photo Credits: Tim Rast

Beothuk Bead Necklaces

$
0
0
Beothuk necklaces and raw materials
 When James Howley captioned a photo of a pair of Beothuk beaded necklaces in his 1915 publication "The Beothucks or Red Indians", he said that they were made from "pipe stems, sheet lead, and of the inner birch bark strung upon a thong of deer skin." Ingeborg Marshall notes in her book, "A History and Ethnography of the Beothuk" that one of the original necklaces had 83 beads and one had 157.  She speculates that the beads they may have served as counters in a dice game.  In these reproductions, I've used cut and ground sections of ochre stained pipe stems for the beads and scallop shells for the discs on each end.  Both examples are copies of the shorter string of 83 beads.

I love getting mail!
When I was stumped for scallop shell to use for the discs on the end of the cords, I put a call out to my friends on Facebook. Within a few hours, Lee Gilbert, who blogs at "A Whole Bunch of Ings" had delivered four big shells and an extra whale rib to my mailbox.  Lee has helped me out several times in the past when I needed the sorts of raw materials that can generally be found washed up on beaches.  Please check out his blog for his kayaking adventures and spectacular photography.


One of these is going to a museum and the other is for a local elementary school.  Both will probably be handled a lot, so I used artificial sinew for the cord rather than twisted sinew.   I think Howley's original description of a "thong of deer skin" is a slight misidentification of a sinew cord.


I'm not certain what species of shell were used in the original artifacts, but I went with scallops because they are big and tough and I knew that I could get the four discs that I needed out of one or two shells.  In fact I got nearly a dozen discs out of one shell.

These are the "pipe stems" that I used for the beads.  They are actually little kaolin clay tubes made for me several years ago by a ceramic artist and conservator in the Province - thanks Jason and Miki!

These are a few beads and the rest of the shell discs after a bit of red ochre staining and scorching.  I add the ochre to match the colour and fire to add age.

The completed necklaces and the materials used to make them
This is one of the originals on display in the Mary March Provinicial Museum in Grand Falls-Windsor.

One reproduction.  It will grow to match the original even more as it is handled and ages.  As the ochre wears through the white pipe stems will show up in greater contrast, like the original.  I'm very pleased with about half of the beads that I made.  I cut some of them a little thicker than they should be.  The original beads are relatively thin and flat.

Two reproductions.
Photo Credits: Tim Rast

Beothuk Reproductions

$
0
0

I'm pulling together a set of Beothuk reproductions for a very patient client right now.  I hope to get it delivered in the next day or two.

It's kind of a fun mix of finished pieces and examples of raw materials.  By including materials with an European origin, like copper, iron nails, and pipe stems alongside the caribou bone, shell, red ochre, and chert gives the whole set a very post-contact feel.  It's 100% Beothuk - you wouldn't confuse a collection like with a pre-Contact Little Passage assemblage, or any other culture in the Province, for that matter.
Photo Credits: Tim Rast

A Set of Beothuk Reproductions for Boyd's Cove, Newfoundland and Labrador

$
0
0
All laid out (click to enlarge)
Here's one last look at the complete set of  Beothuk reproductions and raw materials that I put together for the Boyd's Cove Beothuk Interpretation Centre.  This materials will help the interpreters there illustrate the story of the Beothuk people for visitors.  As I mentioned in the previous post, I think my favourite thing about this set is how it integrates the local materials with the new materials that became available to the Beothuk after European contact.  In fact, for archaeologists working in Newfoundland, the presence of European materials in a Recent Indian artifact assemblage is the biggest defining factor for distinguishing "Beothuk" material culture from the preceding "Little Passage" complex.

Here is a list of previous blog posts that explain some of the pieces in more detail:
A: Caribou jaw bones (left and right halves), B: Gut string, C: Leg and back sinew, D: Rawhide lacing
E: Chert projectile points, F: Iron projectile points (made from nails), G: Ochre stained pendants made from caribou jaw bones, H: Iron square cut nails, I: Modified nail fragment

I: Modified nail fragment, J: Ochre stained gaming pieces, K: Red Ochre (3lbs+)


L: Copper pot fragments, M: Flintknapping kits, N: Hammerstones
N: Hammerstones, O: Flint samples (2lbs+), P: Caribou antler billets (soft hammers for flintknapping), Q: Moose antler billets


R: Assorted chert flakes

S: String of ochre stained pipestem beads with a shell disc on each end. T: Glass seed beads  
Photo Credits: Tim Rast

Water and Sewer Distractions Return

$
0
0
Our street is a little bit gone
I don't think I've gone into a lot of detail here on the blog about our sewer and plumbing woes over the past year or so, but those who know us, know that Lori and I have had ongoing water issues in our house and on our street for a long time.  I would have needed a separate daily blog to keep track of all of the twists and turns that the leaks, backups, trenches, floods, new hookups, remodeling, demolition, renovations, and re-routing took in our basement, through the sidewalk, and into the street.  The sewer and water pipes that we had to deal with were less than 30 feet long, but that length spanned three jurisdictions, from inside our house (our problem, our plumber) , through the sidewalk (city's problem, municipal workers), and into the street (city's problem, contract construction company).  Trying to coordinate the repairs and replacement of pipes across those three jurisdictions over a year's time has been disruptive at best and all-consuming at worst.

This was the trench in front of our house last night.  If you look at the backhoe in the upper right corner of the photo you can see that it is sitting on backfill overlaying three big pipes.  The big black culvert in line with the backhoe scoop in the deepest part of the trench is the storm drain.  Prior to this upgrade, the sewer lines from all of the houses on our side of the street drained into it.  Now we are connected into the smaller green sewer pipe just above it and to the left.  The little waterfall running down into the basin in front of the big black storm drain pipe is flowing out of the old sewer pipe that was connected to the houses on the other side of the street.   The rest of the water flowing into the pipe is coming from the disconnected storm sewer in line with it upstream.  The backhoe at the top of the photo is sitting with its left tread over the sewer pipe and its right tread over the new main water line. 

The green pipes are for the sewer and the big blue pipes are the new waterline.  The skinny blue hula hoop is a loop of blue municipex pipe that runs from the main line to each house.  

One of the white sewer
lines being buried runs
 into our house
Anyhow, we're hoping that things have turned a corner today.  The major sewer upgrade on our street has finally made it's way to our house and we are now completely tied in to the new sewer system.  We had new pipes installed last fall inside our house and under the sidewalk, but they were still running into the storm drains (like every other house on our side of the street).  Today the last stretch of pipe was added and we have all new sewer pipes running from the inside of the house to the middle of the street and on down the line to a treatment plant, instead of flowing into the Waterford River and exiting into the St. John's harbour.

This trench migrates up the street.  The backhoe at the far end of the trench digs out the leading edge of the hole and the one at this end fills it back in again as the workers install the pipes in the bottom of the trench.  They travel at a rate of a few houses a day


The view out of my office window 
While the trench was open through the sidewalk last fall to replace the city's length of sewer pipe between our house and the street we asked the municipal workers to add a new plastic "municipex" waterline to the trench.  This line would eventually replace the existing copper pipes that were installed when the house was built in the 1930s.  That municipex line was hooked up inside our house today by plumbers that we hired and the other end of it is tied into a temporary waterline that is being used on our block while the main line is replaced.  So technically, there will be one more operation on that end of the line by the contract workers hired by the city to do the sewer upgrade, but it shouldn't involve us.  We can begin to focus on putting our house back together after having the house torn apart for months waiting for all the little pieces of the puzzle to come together.

Inside the house is our problem.  Our shut off valve and sewer cleanout used to be in a closet in the corner of the basement, but because we have a porch over that area now we couldn't dig up that part of the sidewalk outside of the house.  That meant re-routing the water and sewer pipes about 8 feet into the main room in the basement.  Now that everything is hooked up again we can begin encasing and refinishing that wall.  We'll need to create some sort of removable access box to cover the valve and drain.
Photo Credits: Tim Rast


Palaeoeskimo Soapstone Pots

$
0
0
I'm working on a set of Dorset Palaeoeskimo tools, including a small soapstone pot or lamp.  I wasn't really thinking things through when I started carving soapstone today as we are having water interruptions on our street again thanks to the sewer upgrade.  I don't need water for the carving, but soapstone is so dusty that I get covered in chalky white powder from head to toe on every trip to the workshop.  Fortunately its raining, so I could at least splash some rain water on my face until they hook up our waterlines again.

The first vessel that I started on cracked down the middle while I was chiseling out the interior.  Its far enough along that I could use it in a sandbox dig someday or even finish it and repair it with some traditional repair techniques, so its not a total waste.  The second one is turning out a little bit better, or at least it hasn't broke yet.  Its more or less roughed out.  I opted for a simple rectangular form with slightly sloping walls.  The soapstone I'm using is fine enough that I could push it and make a very thin walled lamp, but the soapstone fragments from the site that this vessel will help interpret had relatively thick walled pots, so I think I'll probably leave it as is.  It just needs a bit of finishing and I need to make a final pass on the rim, perhaps adding more of an outside bevel.

The soapstone that I'm using is from Green's Rock and Lapidary in Calgary, so it's not a local stone.  Its extremely soft, which means that I've been able to do a lot of the work with hand tools, although I used a drill to open up the interior.  Even so, the hand tools that I've been using have been metal, so I'll probably make a final pass over the whole surface using a scraper like the one on the railing beside the pot in this photo to leave appropriate stone abrasion marks on the surface.
Photo Credits: Tim Rast

A Dorset Palaeoeskimo Set of Reproductions

$
0
0
The Dorset Palaeoeskimo artifact reproductions that I'm working on for the interpretation of the archaeology sites on Dildo Island are all finished.  However, as I write this, I realize that technically there was a harpoon in this set as well, but since all I did on that was make a replacement endblade for one that was lost over the years it slipped my mind.  Oh well.  Here's most of the Dorset pieces; a small soapstone pot, a hafted and unhafted chert scraper and a hafted and unhafted chert knife.

Chert scraper with twisted sinew lashing on a wood handle.  I'm not exactly sure what type of wood I used for the handle, it was left over from a recent project.  It might have been willow.

A Dorset knife with a handle inspired by handles found at Port au Choix, Newfoundland and Labrador.  There is also a replacement blade made from a nice banded grey chert leaning against the soapstone vessel in the background.


My main influence or the scraper handle was this wood scraper handle (right) in the Button Point collection from Bylot Island.  I saw this handle at the Canadian Museum of History when I was there a couple weeks ago to look at the drums in the same collection.  Its a simple open socket, with a well defined groove for lashing.  

The soapstone pot in the background is the same one that I showed in the previous post.  Aside from a little bit of finishing carving and abrading, the main difference is the antiquing, which was done by oiling the soapstone, smearing in charcoal and scorching it in a candle flame.  I haven't quite worked out a way to add thick layers of burnt grease to a reproduction, but it's relatively simple to add a dark stain of soot to make something appear fire-kissed.
 Photo Credits: Tim Rast

Tying on Beothuk Points

$
0
0
Chert and Iron
Beothuk arrowhead
Reproductions
I'm working on a few Beothuk arrows today.  I'm tying points and feathers on to the pine shafts so that I can ochre stain them.  Since I had a few modified iron nail points on hand from a previous project, I decided to try hafting one on to a complete arrow.   The introduction of iron nails to the Beothuk tool kit changed the way points were hafted, although you can still use sinew and glue to tie them to the shaft.  The main difference is that the long tangs would have been tied into a narrow channel carved down along the arrow shaft from the tip, rather than inserted into a cut slot, like the knapped stone points.  The end result would have differed from the stone tipped points in a couple of ways - first the points made on nails would have been slightly heavier, giving more forward weight to the arrow and secondly the prominent barbs on the corner notched chert arrowheads are gone from the slender, leaf-shaped arrowheads hammered out of iron nails.  Would the heavier points penetrate farther and eliminate the need for barbs to prevent the arrow from backing out of the wound?  Or was it just too much of a hassle to cut and file barbs into a hammered iron point?

A side view of an iron point (top) and a stone point (bottom).  The long tang of the iron point needs a lot more sinew lashing to completely encase it.  

Chert, corner notched Recent Indian projectile point reproduction

I think you can see a little more clearly that iron tang fits in a slot running along the outside edge of the wood arrow shaft.  The two points have comparable cutting edges and angles, but the iron point is a little heavier and lacks the prominent barbs of the stone point.  
Photo Credit: Tim Rast

Assembled Beothuk Arrow Reproductions

$
0
0
Chert and iron arrowheads and Beothuk arrow reproductions
The Beothuk arrow reproductions that I talked about on Friday are assembled now and stained with red ochre and oil.  I've made plenty of these arrows with stone points over the years, but this set includes the first arrow that I've made with a hammered iron arrowhead made from a modified nail.  I have made look-alike arrows for film props in this style, but they weren't hammered out of nails and lashed on in the correct fashion. I left off Friday's post wondering about the change in Beothuk arrows that came with the adoption of arrowheads hammered out of nails.

Pine shafts, goose feathers, chert or iron arrowheads, sinew and hide glue binding, red ochre and oil stain

Stone and iron points. The pointy part
of the arrowhead doesn't change a
great deal, but the hafting area of
the arrowheads are very different.
The iron arrowheads were hafted differently because the body of the nail was used as a long skinny tang that would have been lashed into a channel gouged in the side of the arrow shaft.  In contrast, the chert arrowheads that the Beothuk and their ancestors made were designed to be tied into a slot cut into the end of the arrow shaft.  The process of chipping the corner notches into the stone arrowhead created backward facing barbs, so that when the arrow went in, it wouldn't come back out again.  These barbs disappear on the iron nail arrowheads.  The general size and shape of the cutting and piercing part of the arrowhead isn't much different, but the barbs, which had been part of Beothuk arrowhead design for centuries suddenly vanish on the iron arrowheads.  It would have required a little extra effort, but it would have been possible to cut or grind barbs into the iron arrowheads, however the Beothuk chose not to.

Modified nail arrowhead (left)
Knapped chert arrowhead (right)
One difference between iron and stone would be the durability of the arrowheads.  A stone point is very likely to break if it encounters a bone or hits a stone or root on a missed shot, whereas an iron point is much more durable.  Perhaps the barbless design of the iron points is evidence that iron-tipped arrows were designed to be re-used.  Without the barbs, arrows could easily be withdrawn from the killed animal.  With stone points the chance of the point being re-usable was much lower, so there's no reason to make the design easy to remove from the wound.  The iron would also probably have a little more value associated with it, both because its durable, but also because its new and rare, compared to stone.  Again, this would create more incentive to retrieve and reuse the arrows.


Arrowhead and two feather fletching based on historic descriptions and drawings of Beothuk arrows
The same arrowhead and feathers shown in profile.
Photo Credits: Tim Rast

CCI Archaeological Conservation Workshop

$
0
0
Cliff Cook and the underbelly of a plaster of
paris block lift in chloroplast form
Cliff Cook, from the Canadian Conservation Institute is in St. John's delivering a two day workshop on archaeological conservation field techniques.  The first day was excellent.  We spent the morning in the classroom and the afternoon in the lab practicing block lifts.  Block lifts are used to carefully remove artifacts from a site along with their surrounding soil matrix so that they can be carefully excavated uncovered in controlled conditions in the lab.  It's rare that artifacts will need to be treated this way, so by practicing in the lab we can gain experience with a lot of different techniques that might work in different situations in the field.  We used all sorts of materials to secure the blocks, including plaster of paris, gauze, wax, resin, foam, and dry ice.  We learned a range of techniques for protecting the artifacts and transporting the blocks.  Its an excellent course - a lot like learning first aid for your fragile artifacts.  Big thanks to MUN's Department of Archaeology Conservator, Donna Teasdale, for organizing this event. 

Using dry ice to freeze an artifact and the surrounding soil into a solid block that can then be transported off the site in a solid block.

Dry ice and soil


Using a freeze spray to quickly freeze a small textile fragment

Cellophane is used to keep the artifact from sticking to the block material.  Damp paper towels are used to lock in moisture, and tin foil is used to create a barrier to pour plaster or resin against.

Jason and Miki are planning a block lift using a resin gauze designed for making casts around broken bones.

Assorted blocks.  Different types of blocks will last different lengths of time.  The frozen blocks might thaw out in a few minutes or hours, while the plaster, foam, or resin blocks are stable for months or years.

Photo Credits: Tim Rast

Beothuk and Dorset Palaeoeskimo Reproductions

$
0
0
Beothuk and Dorset
Palaeoeskimo Reproductions
Here's a final look at the Dorset Palaeoeskimo and Beothuk artifact reproductions that I completed earlier this week for an updated display that is being developed to interpret the archaeology of Dildo Island.  These reproductions represent the types of tools found at the site(s), although they aren't exact copies of individual pieces.  I used other archaeological sites and historic references from Newfoundland and Labrador to fill in the gaps.  There is one more large Beothuk piece to complete and deliver at a later date, but I need to harvest a sheet of birchbark sometime over the next couple of months to make that happen.  

In the last photo that I showed of this little soapstone lamp, it was shiny and green because I had a fresh coat of oil on it.  Here it is a few days later, after the oil has soaked in and dried to a nice matte grey colour.  The soot staining around the base remains dark.

Clockwise from 12 o'clock: Dorset Harpoon (wood, antler, bone, chert, sinew, sealskin, hide glue), Dorset pot (soapstone), Dorset unhafted scraper (chert), Dorset hafted scraper (chert, wood, sinew, hide glue), Dorset hafted knife (chert, antler, sinew, hide glue), Dorset unhafted knife blade (chert), awl (bone - this tool is generic enough that it could belong to either culture), three Beothuk Arrows (chert, pine, goose feathers, sinew, hide glue, red ochre)

 Photo Credits: Tim Rast


A Groswater knife blade

$
0
0
This is the last week that I have to finish up Elfshot projects before the start of the summer field season.  I'm trying to wrap up a wholesale jewelry order for The Rooms and a teaching set of reproductions for a local elementary school.  I think I can get the jewellery done before I go, but I'm not certain about the order for the school.  This little chert asymmetric Groswater Palaeoeskimo knife blade belongs to the school set.

 Photo Credits: Tim Rast

Chert Arrowheads and Endblades

$
0
0
Local Newfoundland Chert
After three days of knapping, there are nearly 90 points in the workshop ready to be turned into necklaces, earrings, lapel pins, and tie-tacs.  Most of these Beothuk arrowheads and Dorset and Groswater Palaeoeskimo endblades will end up as jewellery for sale through the gift shop at The Rooms here in St. John's.  It's been a while since I've restocked a store with this quantity of Elfshot jewellery, so if you have been waiting for the right moment to pick something up, your chance is coming up.


The large biface in the middle is a Groswater Palaeoeskimo assymetric knife, but the rest are arrowheads and endblades.  The upper right corner is full of triangular Middle Dorset Palaeoeskimo endblades, the lower right corner is Groswater Palaeoeskimo box-based, side notched endblades and the left side contains corner notched Beothuk arrowheads.  The larger ones will be turned into necklaces and the smaller ones will be paired up into earrings.  The lonely ones left behind will become tie tacs and lapel pins.
Photo Credits: Tim Rast

Too Cool for School? Not this school...

$
0
0
Reproductions spanning 5000 years
 of history and multiple cultures
Believe it or not, this is a set of artifact reproductions that is on it's way to a local elementary school.  Teachers at Beachy Cove Elementary School in Portugal Cove-St. Philips put together an order this spring for a set of museum quality artifact reproductions to use in programming with their students.  Although I don't have kids, I've got to know a few teachers and students in the St. John's area through classroom visits and the Open Minds program at The Rooms.  The parents, students, and teachers from Beachy Cove are consistently remarkable.  This K-6 school now has a collection of Newfoundland and Labrador artifact reproductions on par with this Province's national and provincial historic sites and museums.  I was very proud to receive this order and I hope the students enjoy working with these pieces as much as I enjoyed making them.


Photo Credits: Tim Rast

Elfshot at The Rooms Gift Shop

$
0
0

The Rooms Gift Shop in St. John's currently has the largest inventory of Elfshot jewellery in the Province.  I dropped off a large order of Recent Indian (Beothuk), Dorset Palaeoekimo, and Groswater Palaeoeskimo necklaces, earrings, lapel pins, and tie-tacs late last week.  They should be on the shelves now or very shortly.  I've closed up my studio for the summer as I head into the field today, so I won't be able to restock the shop over the summer, which means that for the best selection, you should visit the shop early.

 Photo Credit: Tim Rast


Archaeology at Kamestastin

$
0
0

The Newfoundland and Labrador Archaeological Society and the Labrador Institute Speaker Series present a free public lecture on the Archaeology at Kamestastin by Chelsee Arbour.  The talk takes place at the Labrador Institute Research Station in North West River, Labrador on June 25, 2014 at 7PM Labrador time.  Admission is free.  

Photo Credit: NLAS & LI poster with a photo taken by Stephen Loring.
Viewing all 437 articles
Browse latest View live